In today’s work-from-home era, setting up a Remote Desktop Connection (RDC) can make your life a whole lot easier. Here’s a simple, step-by-step guide to get you started.
Step 1: Turn on the Remote Desktop
Go to your computer settings and switch on the Remote Desktop feature to allow connections.
Step 2: Remember the Port and User
Jot down the port number and the username associated with your Remote Desktop Connection. You’ll need these later.
Step 3: Find Your Computer’s Address
Locate your computer’s unique address, known as the IPv4 address. It’s like a home address for your computer.
Step 4: Adjust Internet Settings
In your computer’s network settings, find internet properties. Select Internet Protocol Version 4 (IPv4), go to properties, and choose “use the following IP address.” Enter the IPv4 address and click apply.
 Internet Procotol Setting[/caption]
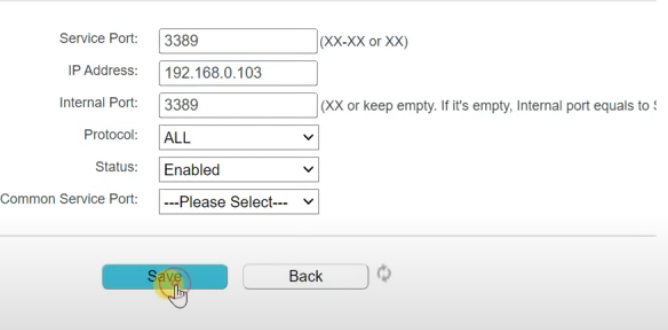
Step 5: Router Port Forwarding
Go into your router settings and look for port forwarding. Input the IP address and port number you noted earlier. Hit apply to create a direct path for Remote Desktop traffic.
Step 6: Write Down Your Router’s External Address
Note the WAN IP address of your router. This is the external address you’ll use to connect remotely.
Step 7: Dynamic DNS Setup (If Needed)
If your router’s WAN IP address changes set up a Dynamic DNS (DDNS) service. Some routers, like TP-Link, allow you to use services like noip.com for this. It ensures a consistent way to access your computer.

Step 8: Configure Dynamic DNS
Sign up for a dynamic DNS service, such as noip.com, and follow the provided instructions to set it up on your router. You’ll usually need to enter a link given by the service in the dynamic DNS section of your router settings.
By following these simple steps, you’ll be all set for a Remote Desktop Connection. For added security, consider using strong passwords and two-factor authentication. Now, you’re ready to access your computer from anywhere with ease!
#usa #remotedesktop #rdp #vps